The end of term has arrived, and with it comes the end of my regular inquiry blog posts. The timing is serendipitous in many ways; I’ve touched on the major points that I was eager about (such as pseudonyms, organizing my submissions, and researching literary magazines), and now that my first round of submissions are out there, my next major task is hang tight and wait for responses back.
The waiting game is a key part of the process for all writers, but it’s the unglamorous part that, while filled with anticipation, is not especially interesting to write about. So just know that in the coming weeks that you don’t hear any update from me, I am waiting eagerly, anxiously, and doing my best to continue carving out writing time even while the end of term and start of practicum comes my way.
Though my Educational Technology class will be well over at that point, I’ll write up a follow-up post upon receiving my first response back from a literary journal, whether it’s an acceptance or, as is statistically more likely, a rejection! Regardless, I’ll be eager to update you on my progress at that time.
My last week’s EdTech weekly reflection post was all about the weight of digital footprints and the importance of discretion for educators in online spaces. An unexpected result of this class: has me reconsidering my long-held stance against pseudonyms.
Perhaps stance is a bit extreme given that I haven’t thought much about pseudonyms beyond a sparkling of interest based on how others’ use them, but in the context of my own writing, I’ve always given the idea of them a hard pass. What is the point of investing the time and effort into writing a story if you’re not even going to claim it as your own?
After our class last week, with guest speaker Jesse Miller of Mediated Reality, I began to understand on a more personal level why others have elected to use pseudonyms in their writing. As an educator, whose online presence will be heavily scrutinized, I am understanding this idea in a whole new way.
This is not to say that pseudonyms are the right fit for all writers. Check out the video below about some of the important pros and cons to keep in mind if you’re considering using a pseudonym for your work:
What has this process looked like?
I’ve been brainstorming pseudonyms this week. It’s been a fun process, like coming up with a character names, only with a lot more weight behind the process. I’ve been bouncing ideas off with my Mom, whose been really supportive with my writing process for a long time. I’d share some of the names here, but that would defeat the purpose of making a pseudonym in the first place, wouldn’t it?
I don’t think I’ll be using pseudonyms for everything. There is some work I’ve done that I wouldn’t mind others associating with me, and as mentioned, part of the enjoyment of writing for me is getting to slap my name on it once I’ve finished.
Have you used pseudonyms before? Do you have any advice to share with me? Drop me a comment below!
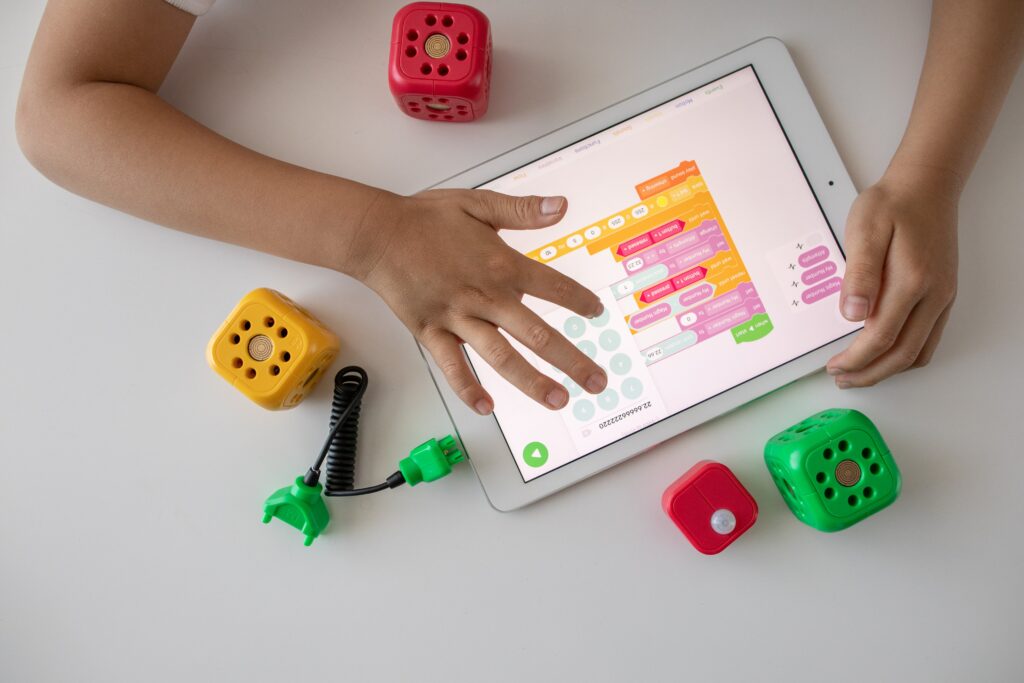
This week was all about the benefits of coding in the classroom.
Our class played around with the sorts of coding activities that we might engage our learners with; it’s generally a good idea for educators to try out any class activities they intend to introduce to their students, that you’ll have a better grasp on the sorts of questions or roadblocks your students might encounter along the way.
With that said, I chose to try out the “flappy code” game. I did get into the FlappyBird hype back when the game was first released, so this was more exciting for me than some of the other options available.
I appreciate that each drag-and-drop block used to “code” your game does, in fact, act as a functional representation for the actual code that your version of the game is running on. The blocks seemed to fit intuitively together thanks to their puzzle-like grooves, and I found it useful to be able to tab between the blocks and the code they represented to get an actual feel for what it all looked like underneath.
As a Flappy Bird fan, I was excited by the options to change the background, character and pipe assets. When I learned that I could randomize each asset each time upon successfully flying my character past an obstacle, I was genuinely floored. Take a peak at my fun creation (and the code used) in the GIF below:
Benefits of Computational Thinking in the Classroom
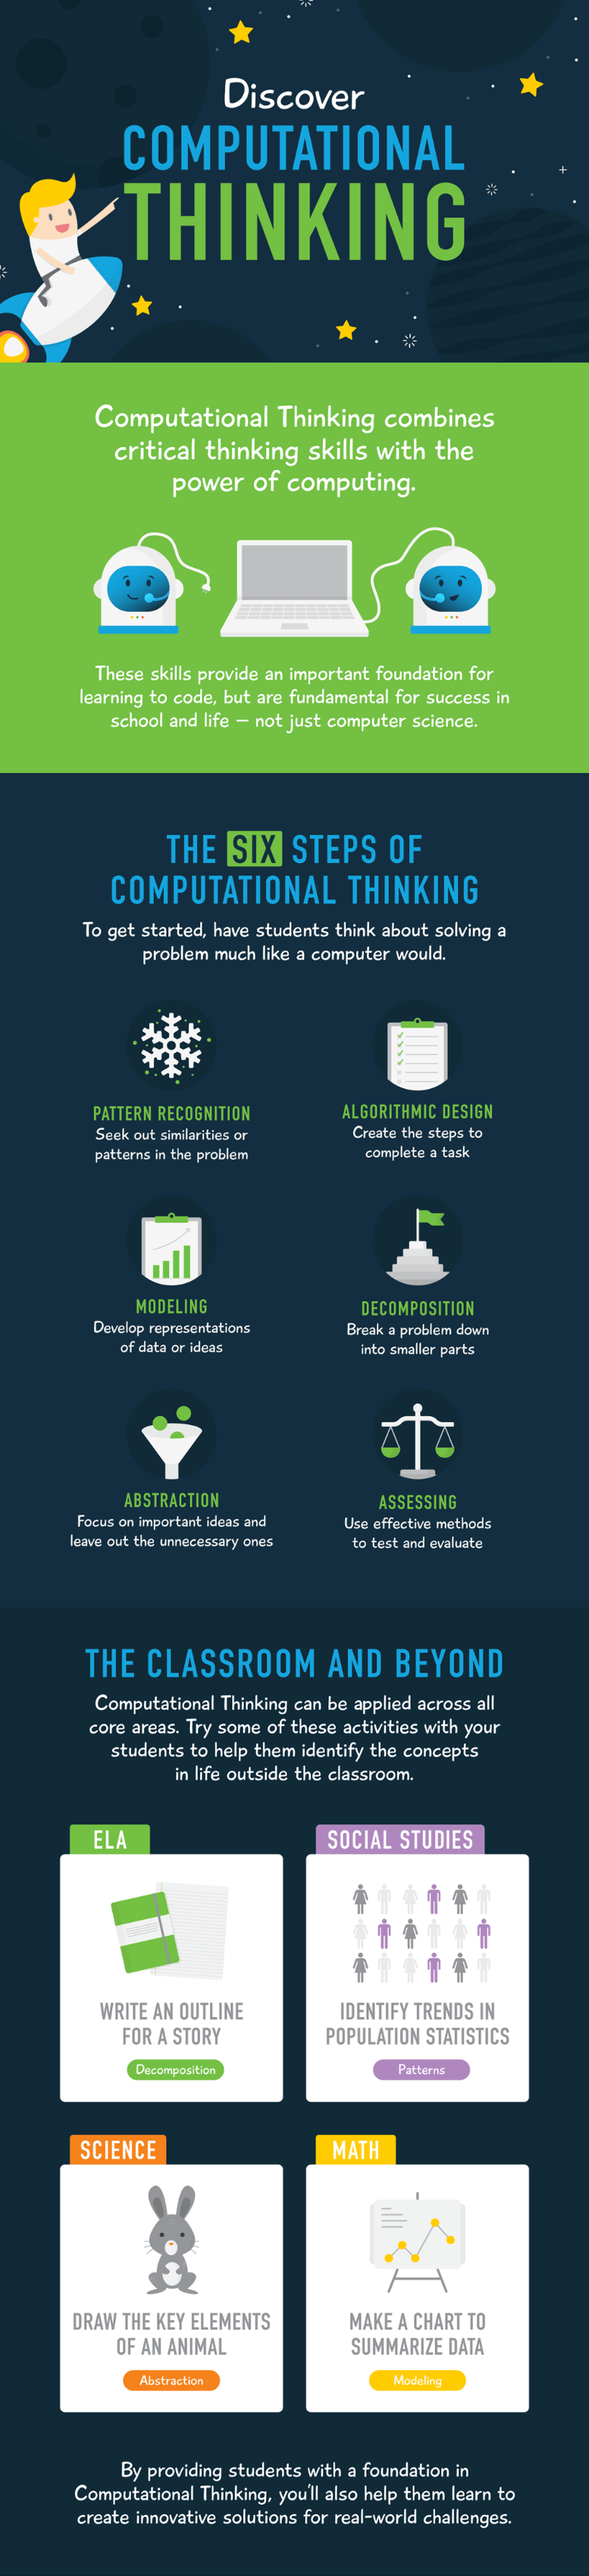
Another topic of import this week was computational thinking. Is this a new term to you? It was to me! Check out the infographic below for more information:
Based on the content of the infographic above, I think it’s pretty clear to see how computational thinking has some great cross-curricular benefits. Beyond math, even, students can using computational thinking to aid them in all sorts of projects. In fact, I would argue that decomposition, the breaking down of a problem into smaller parts, and algorithmic design, creating the steps to complete a task, are both integral aspects in planning and delegating for any school projects that students work on.
Really, computational thinking can help students to become better, more gritty learners. A huge part of computational thinking is establishing a clear course of action (based on careful assessment of the situation and planning carefully based on that), following through, and then assessing the outcome; was the result what your students intended? If not, back to the drawing board; what needs to change about the plan to get the result they’d like? Or perhaps do they need to go back even further, to re-assess the problem or situation itself? Perhaps the outcome was off-base, but might have useful applications for another project that students are working on.
This sort procedure process and willingness to revisit one’s process is not something that will come naturally to all students. Offering specific strategies to students, as well as many opportunities to try them out and maybe even fail (which, really, is just an opportunity to try again) are integral!
Have you ever thought about incorporating computational thinking into your classroom? Drop your thoughts or any tips to share below!
How can video editing tools enhance classroom learning?
Students can use video editors, like iMovie, to create educational videos that explain complex concepts: like a math problem, science experiment or historical event. Having the students present a visual representation of a concept can help them understand on a deeper level.
For example, video editors can be used to document group projects, by recording each team member’s contribution and showcasing the final product. This can help students to reflect on their learning and improve their communication and teamwork skills. It can be used to create multimedia presentations that incorporate video, images, and music; making presentations more engaging and helping students to convey their ideas more effectively.
Video editors can also help students develop digital literacy skills such as: conducting research and planning content through digital tools such as search engines and online databases to gather information, evaluate sources, and organize their ideas. Storytelling or conveying a message through visual media requires students to think critically about the purpose of their video, identify their audience, and craft a compelling narrative. This leads into building their writing and editing skills as students need to write and edit their scripts, ensuring that their message is clear, concise, and well-structured. Media production allows students to experiment with different media production techniques, such as lighting, sound, and camera angles. This helps them to develop a deeper understanding of how media works and how to use it effectively. Lastly, through collaboration: video editing is often a collaborative process, requiring students to work together to produce a final product. This helps them to develop teamwork and communication skills, as well as an appreciation for the contributions of others.
What does this look like in the classroom?
Teachers might choose to employ video editing software in some of the following ways:
Video tutorials or guides for in class work, which can be uploaded to the classroom blog or website. Students can then review this content at their own pace.
Classroom announcements to connect with parents, and serve as a more personalized version of a traditional parent-teacher newsletter.
Documenting student learning throughout the year (in the form of a video portfolio), though this requires written parental consent and careful attention to video storage practices.
Additionally, teachers might incorporate video editing software into student learning in any of the following methods:
Slideshows: these can be a great, easily accessible video editing project for students to learn the basic ins and outs of using video editing software. Can be used as individual, small group or whole-class projects to either showcase key elements of a project, or to celebrate class events (a re-cap of a previous field trip, for example).
Stop-motion motion videos: students can recreate historical or fictional events, or even depict a story of their own making. Great cross-curricular elements between art, language arts, digital literacy and social studies.
Commercials, news-skits, interviews etc. These can be more interesting methods of presenting current-events related work, while also building digital literacy, research and drama skills.
While these are only a few examples of the ways that video editing software might be used in the classroom, we hope that they’ll serve as a solid jumping off point for coming up with some useful video-editing projects for your own classroom!
What are the Pros, Cons, and Risks of using Video Editing Technology in the classroom?
Pros:
The programs are easy to use, and for both windows and mac, there are written and video tutorials available online
It is a great way for students to demonstrate their knowledge in a creative way while enhancing their digital literacy skills
It typically increases engagement
It can be so versatile for both teachers and students. Teachers can make their lectures more inclusive by inserting subtitles or additional graphics. Students can create a variety of things like book trailers, tutorials for how to solve problems in math or science, video presentations, etc
Cons:
Not all students have access to technology at home and may not know how to use it as efficiently as their peers. If assigning projects that incorporate video editing, make sure to assign and scaffold class time to complete any video projects during school hours
We discussed student privacy with Jesse Miller and the fact that it is best to use school provided (not personal) devices when taking pictures or videos of students at school. It is also a good idea to have some kind of waiver for parents to sign about filming students so that they are aware of the projects students are working on and the technology being used to do so
For teachers, it can be very time consuming to film and edit content on top of lesson planning so it is probably best to come up with a balance of in person and digital content. It can also be time consuming for students to plan, film, and edit content, so make sure to scaffold time allotted for each of these activities.
Technology can definitely be a distraction but it can be a useful tool when used effectively. Make sure to be incorporating it with purpose and clear expectations of using it for educational purposes at school
Strategies, Best Practices, and Tips for using Video Editing Software
Using videos in the classroom can be used as an opportunity to promote academic success and independence among students. Videos allow students to take their education into their own hands when provided lessons that can be watched independently and at their own pace. This allows students to confidently come to class and be prepared to engage in their work and ask follow-up questions to the teacher or classmates. This style of teaching differs from the traditional method of students sitting for lectures at school, then working on the material as homework when questions often arise. Online lessons would free up the teacher’s time to then work one on one with their students. This would allow the teacher to individualize their instruction and have a better chance of ensuring that all their students are on the right track.
As we mentioned previously, the video lessons could be made in such a way that enhances the content. Composed in a manner that engages students by incorporating pictures, text, and sound. This creates a dynamic learning experience that appeals to differentiated learning styles. There are opportunities to make videos interactive, allowing students to test their knowledge and receive immediate feedback. Incorporating multimedia while describing new topics helps to reinforce novel content by allowing students different modes of interpreting and understanding the material. Ultimately, making it more memorable and engaging to the students.
Canva infographic on tips for incorperating video editing into the classroom
At this point in the process, there is not a tonne to report on (nothing too new or interesting, anyways), but seeing as the intention behind this blog is to document my weekly process, I’ll offer an update regardless.
I’ve continued delving through my old work and revising. The further back I’ve gone into my drafts, the more jarring the experience has been. I would credit that to the fact that after sitting unseen for 5+ years to that fact that some of my stories are genuinely surprising me. The core plot and characterizations are not things I could ever forget, but the actual literary devices used were less cemented in my mind. Some of these efforts read as clunky, but there have been others that, while reading, have evoked a genuinely floored reaction of “I really wrote this?”
Returning to my old drafts been a highly rewarding experience in and of itself.
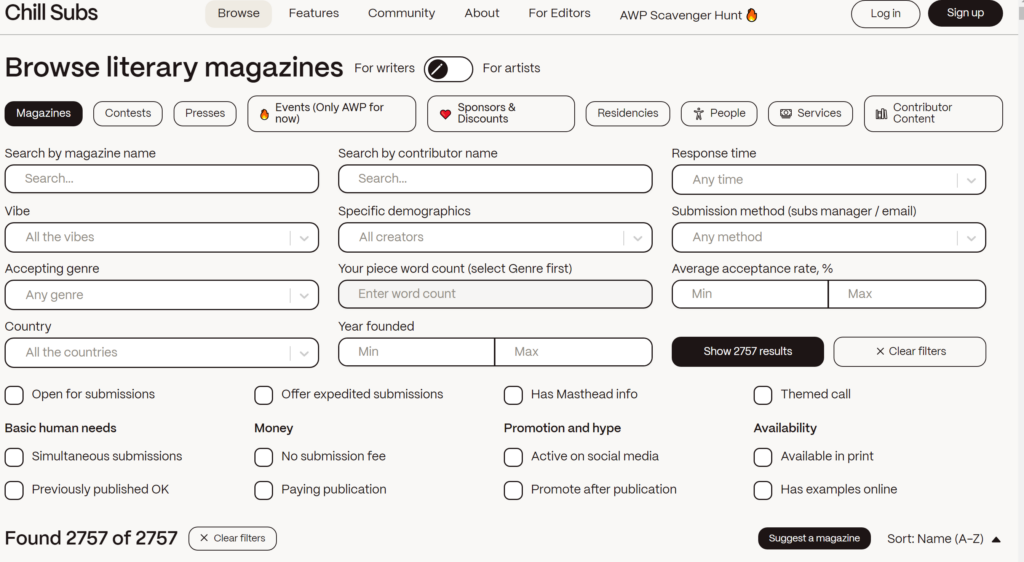
Another Great Submissions Website
The other piece I wanted to touch on for this post was a fantastic submissions website called Chill Subs. One of my colleagues shared this website with me, and I have been absolutely floored by the scope and specificity of filter options. Just take a look at the screenshot above —talk about beautiful!
For me, the most exciting has been the ability to filter by genre, country, lack of submission fee, and paying publications. I’ve found several great options this way.
I’m eager to continue on my revision and submission journey, and am looking forward to updating you further next week!
This week, our class was honoured to have Jesse Miller of Mediated Reality come in as a guest speaker. He spoke on the importance of matters of privacy and safety online, and what this means for both educators and students alike.
Our digital footprint was, in particular, a key point of the conversation. As educators, our public image is often the subject of scrutiny by students, parents and our school administration alike —and digital spaces are no exception to this fact. I was grateful to already have some understanding of this fact, as well as a general understanding of the importance of discretion when sharing in online spaces; when we were asked to google ourselves on an incognito tab, I couldn’t find a single link about myself for several pages of google search results.
The importance of discretion and privacy in online spaces is something that took a lot of discussions with my parents and teachers growing up. I’m very grateful to have a host of adults who were fairly knowledgeable about the risks and concerns that came with the internet, even as intentionally spending time online was only growing in popularity. This understanding of how to appropriately navigate online spaces is not intuitive, after all, and as educators it is imperative that we do our best to instill a strong understanding of the rules of the internet, of polite discourse, discretion, privacy, and critical thinking.
While watching informative Youtube videos, like the informative TedTalk by Jesse Miller below, can serve as a strong jumping off point for an engaging discussion with your students on the subject, it is important to follow up such conversations with concrete practice of best practices online for privacy settings and communication.
What are your thoughts on how best to teach the importance of discretion and safe practices on online spaces? Shoot me a comment below to connect!
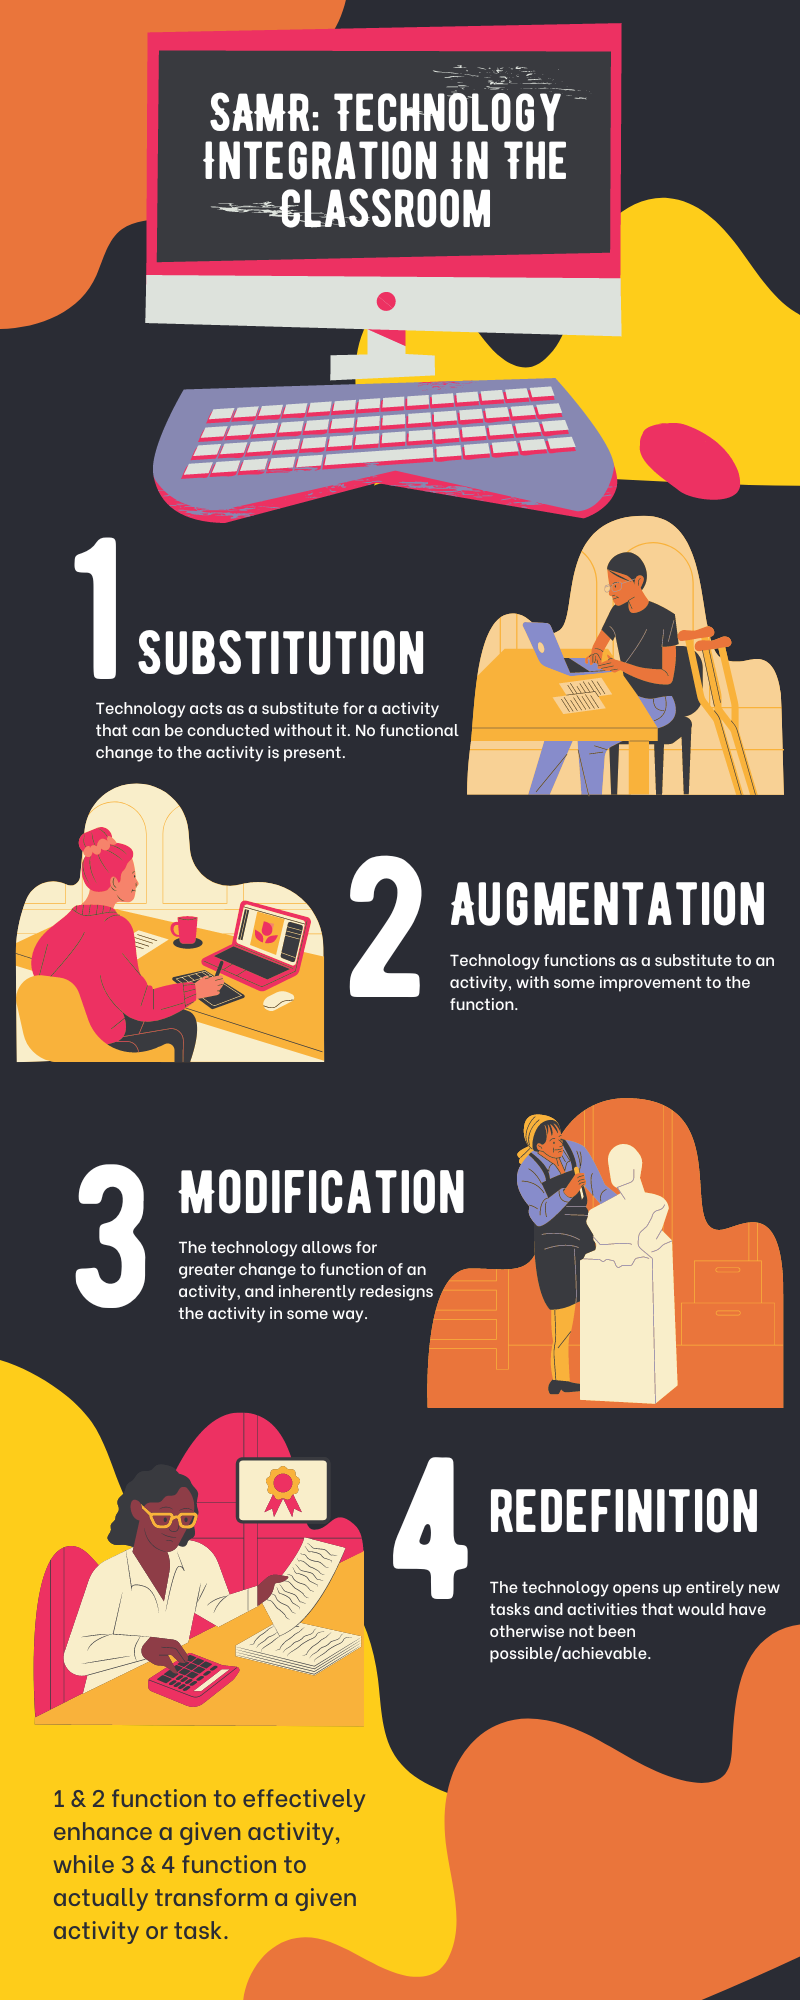
This week we talked about SAMR, a fantastic tool that can be used when assessing if any given new piece of technology will bring worthwhile value to the classroom space. Take a look at the infographic that I created on Canva below for more information on what SAMR is all about:
As established above, technology that functions as a substitution or to augment (and thus to improve upon in some way) another activity or task, has less overt value than technology that offers a greater modification or redefinition that greatly enhances or alters said activity or task. This SAMR model is useful in that, as educators, it is important that we weigh new technology against cost barriers and time barriers (with regards to installation, the learning curve for students and teachers, etc) when integrating new technology into the classroom.
These considerations will definitely help me when I am a teacher myself, and faced with the choice of bringing in new technology or sticking with the technology that is readily available to me. While much of SAMR feels intuitive, I do think there is value in comparing technology against a credible tool, both for my own purposes, and to be able to advocate for the value of new technology to administrators and parents alike.
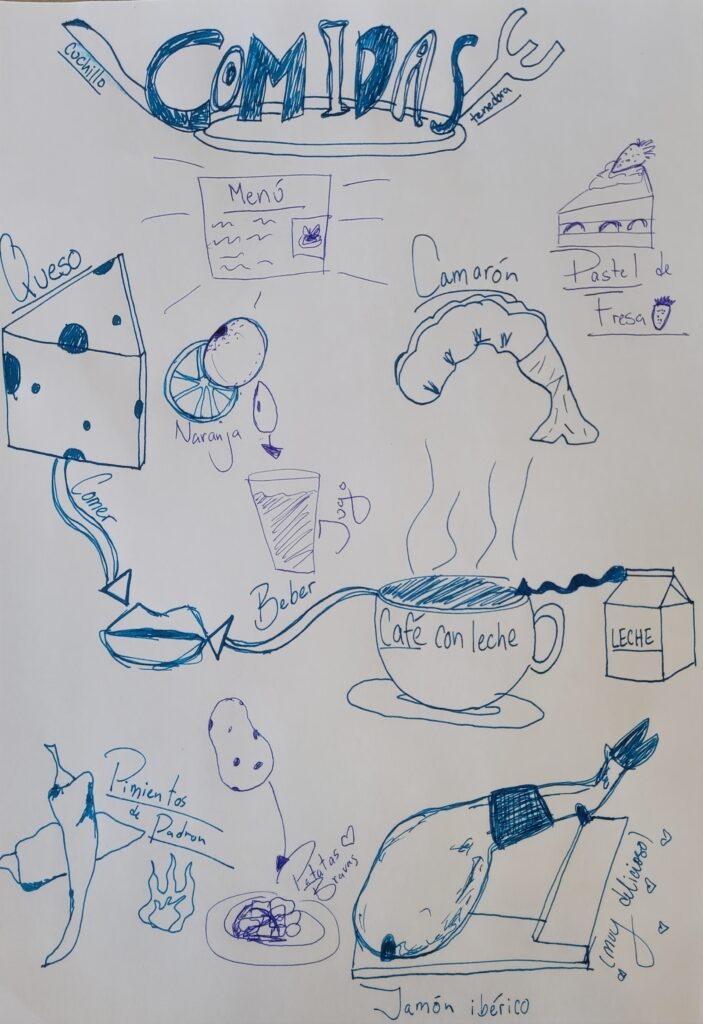
This week we also learned about Sketchnoting, which is a method of note-taking that focuses on using key images and ideas of important subject matter as an alternative (and arguably better) version of the traditional text-heavy note-taking formula. The idea here is that sketched images can help boost the note-taker’s retention of the subject matter at hand, and that when paired with key written information (that may provide necessary context or clarification for the given images), learners have a more engaging, efficient and effective method of taking notes.
I made the Sketchnote above in class this previous Friday as a method of documenting some important food-related Spanish words. While the above example is more detailed than I would expect of any of my students, I can absolutely see myself integrating sketch-note projects into various content-heavy subjects where understanding is key (science, math, social studies, etc.). The cross-curricular elements of art and writing appeal to me from a cross-curricular standpoint, but also from an assessment standpoint, as student-made Sketchnotes could be a great way to check for student understanding of a given subject (formative assessment). I appreciate as well that Sketchnotes could be used as reference points for students throughout a unit, and even compiled into their own, year-long Sketchnote portfolios.
What do you think about the role of SAMR for educators, and the integration of Sketchnoting for elementary school students? Drop me a comment to check in!
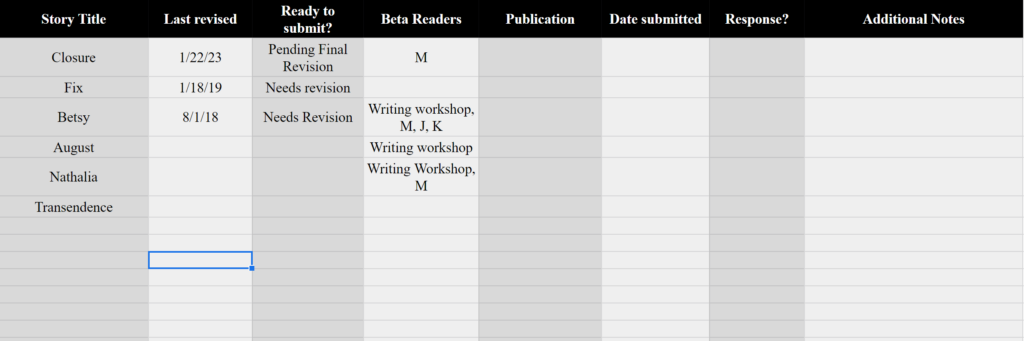
This week is all about organization. Now that I am deep in the process of research and revision, I’ve found that it is getting increasingly difficult to organize all the relevant information in a way that is clear and coherent. As I will soon be querying publications, it will be important for me to also keep track of which publications accept simultaneous submissions, the date that I’ve submitted each piece, and whether each piece receives an acceptance or rejection.
Considering all these moving pieces, I decided that a google spreadsheet was the right software for the job.
Getting in Deep with Google Spreadsheets
Here is a quick screenshot of the google spreadsheet that I created:
The above is the result of several hours of tinkering and research. I fell down a small rabbit hole regarding conditional formatting in google spreadsheets, and I found this website post and this video helpful for my specific purposes.
In the end, I used conditional formatting to use color to indicate whether any given piece is “PENDING RESPONSE,” “ACCEPTED,” or “REJECTED.” Take a look at the screencast GIF below for a better understanding of how this works in practice:
I personally like having each row color-coded; this way, I tell what stage each creative work is at within the submission process from a single glance.
My spreadsheet looks quite bare at the moment, but I will be adding in the rest of my works and publications I am interested in the coming week(s).
In true inquiry fashion, this week has been all about research. Specifically, I’ve been busy researching various journals and literary magazines to find those that might be up my alley.
A colleague of mine, Maya, suggested I check out Submittable. By selecting “Literary” as my search category, and selecting the “No Fee” filter, submittable offered up four pages worth of results, categorized based on each publication’s submission deadline.
Within twenty minutes, I had already found a half dozen publications that could be good fits for some of my stories. I likely won’t be ready to start submitting my work for another 2-3 weeks; in the meantime, I am excited to dig further into this research.
If you’re on a similar journey to me, then I suggest you check out the video above, which offers some great insights into the process of submitting short creative works to literary magazines. The section from 0:38 to 6:15 offers particularly helpful information as to how to check if a publication might be right for any given creative work.
With this information in my back pocket, I was able to begin listing publications that I am interested in submitting my work to at a later date. The next step, then, will be to create a means of organizing all these publications (and their submission dates/genres) alongside my own revision process, submission efforts, and the responses I receive back.
Prior to this week’s EdTech class, I thought of digital accessibility as something garnered through supporting applications or devices (like screen readers). It was compelling (and slightly overwhelming) to learn about all the ways I can modify my blog from the backend to make it more accessible to others.
Some of these tasks were enjoyable to me. For example, I greatly enjoyed going through my previous blog entries (and this one) and inserting alt-text for the images in my posts so that folks using screen-readers will be able to engage with the content of these images, too. I didn’t know about alt-text beforehand, and considering how much fun I have picking out images for my blog, I’m glad to be able to share them with all my readers.
I was also surprised to learn about how properly formatted headers allow those with screen readers to more easily navigate through cohesive chunks of written work, as opposed to having to wade through a wall of text for a specific point. Additionally, I was interested to learn more about high-contrast elements and the ability to zoom into text across browser and mobile mode to make reading accessible for visually impaired readers.
What practices often get missed?
As soon as I learned about the importance of high-contrast elements for visually impaired site users, I instantly thought about the many ~aesthetic~ websites I’ve scrolled across (blogs, or even shop sites) that prioritize cute color schemes over accessibility. I think this also beckons a larger conversation about the lack of awareness around digital accessibility; what it means, how it functions, and how to get started.
Check out this great video we watched in class this week:
I wanted to share the above as it provides more specific examples of digital accessibility, and grounds these examples in the importance of their real-world contexts.
I also wanted to share this great website to check how accessible your blog (or a favorite website) is. I appreciate that it flags specific errors or concerns, and provides context for why these accessibility considerations matter.
An Accessible Return to a Past Multimedia Strategy
Last week, my reflection post featured a screencast video (utilizing H5P) that showcased how to search for just the right pattern on my favorite website, Ravelry. While I was very excited to create this video last week, I am now acutely aware of the fact that I created a video without captions. I have rectified the previous tutorial by uploading it to YouTube, and manually editing the auto-generated subtitles.
This process took considerably longer than I thought it would, and that is with auto-generated subtitles on a relatively short video. I believe this extra time was absolutely worth it, though it gives me much greater respect for longer-form video essays I have watched on YouTube (30+ mins) that use well-formatted subtitles.
What has your experience been with creating digitally accessible content? Was there anything you were surprised to learn about in this post? Drop me a comment below to check in.